This tutorial concerns a very specific model from Dell but it can be applied to other machines from the American manufacturer or from another brand. Indeed, despite a processor given as compatible by Microsoft, it is possible that your configuration does not meet Windows 11 prerequisites.
But then, if the computer (desktop or laptop) meets the requirements of Windows 11, both in terms of processor, RAM, disk space and TPM protection, what is the problem? Simply maybe the installed Bios version is too old to support the Windows 11 installation setup.
This tutorial was made with a Dell Optiplex 5060 desktop computer, a series of professional PCs released in 2017 but still relevant depending on the hardware configuration chosen at the time. In our example, it is a configuration with Intel Core i5 8500 processor, 16 GB of DDR4 RAM, 250 GB M.2 SSD, integrated Intel graphics card. A configuration still largely valid for hosting Windows 11 in 2023.
While the machine was running on Windows 10, it was impossible to update the OS to Windows 11 due to non-respected prerequisites. When we look at the compatibility of the config and its components, everything corresponds to Microsoft’s requests. Explanations on the procedure to be applied for install Windows 11 on a Dell Optiplex 5060 (same with Optiplex 3060 and 7060). The version of Windows 11 chosen here is 22H2, released at the end of 2022.
If you have any questions related to this tutorial, you can ask for help on the Windows Easy free forum.
Steps to Install Windows 11 on Intel 8000 Series CPU
1. Download and install the latest Bios available
It may be necessary to install a compatible OS on purpose, for example Windows 10, to be able to install the latest version of the Bios offered by Dell.
1. Go to the site Dell – Drivers and Downloads.
2. Enter the TAG (Dell serial number) of the machine in question.
3. Open list of driver downloads and locate the line with “Dell OptiPlex 5060 System BIOS » (or other reference depending on your PC model).
4. Download the latest driver available.
5. Close all open programs.
6. Install Biosthe computer restarts automatically.
Note: on a laptop PC, you will need to connect the mains power cable for this operation.
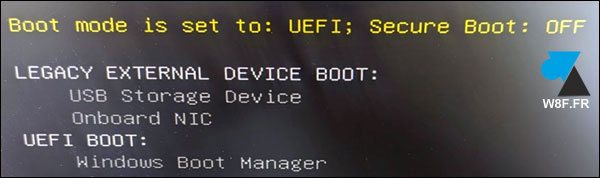
2. Change Bios Boot Type
1. After installing the latest Bios, restart the computer and press the button several times in succession F12 keyboard to open the Dell Boot Menu.
2. Change the startup type to ” UEFI Secure Boot OFF« .

3. To validate the change, the computer restarts automatically.
1. To extinguish the computer.
2. Plug in a USB flash drive with the installation of Windows 11.
3. Start PCto push on F12 to return to the menu …….
4. Ask boot from usb drive.
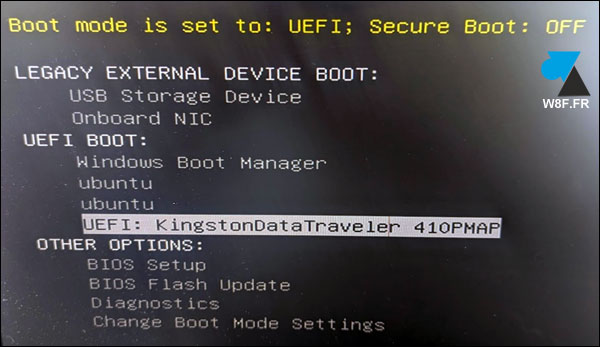
5. The installation is then classic, see this tutorial to install Windows 11.
You have successfully installed Windows 11 on a computer that was listed as not Windows 11 compatible!

Leave a Comment